|
What's a screen shot?
 f
you're making a how-to packet that teaches computer skills, it's useful
to include pictures of the steps as you go. You might want a picture
of a Web page, your desktop, or an application window. These images
assist the learners by giving visual examples of the tools or menus
you use in your tutorial. The pictures in this article are examples
of using "screen shots" to illustrate a tutorial. A screen
shot is a picture of all or part of your screen. You can essentially
"take a picture" of anything that appears on your desktop.
After taking screen shots, you can insert these images into a word
processed document. You will see a number
of screen shots in this article.
To make screen shots, you need the screen-capture shareware
Flash-It, or another similar extension. You can download Flash-It
or a similar application for either Mac or PC
by following the links at the end of this article. f
you're making a how-to packet that teaches computer skills, it's useful
to include pictures of the steps as you go. You might want a picture
of a Web page, your desktop, or an application window. These images
assist the learners by giving visual examples of the tools or menus
you use in your tutorial. The pictures in this article are examples
of using "screen shots" to illustrate a tutorial. A screen
shot is a picture of all or part of your screen. You can essentially
"take a picture" of anything that appears on your desktop.
After taking screen shots, you can insert these images into a word
processed document. You will see a number
of screen shots in this article.
To make screen shots, you need the screen-capture shareware
Flash-It, or another similar extension. You can download Flash-It
or a similar application for either Mac or PC
by following the links at the end of this article.
|
|
Capturing an Image
 o
begin, you need to create and save an image to your hard drive. Saving
an image to your computer is called "capturing" the image.
For example, if you want to take a picture of the menu bar in a word
processing program, follow these steps: o
begin, you need to create and save an image to your hard drive. Saving
an image to your computer is called "capturing" the image.
For example, if you want to take a picture of the menu bar in a word
processing program, follow these steps:
- Open Microsoft Word or any word
processing program. You should see the menu bar across the top of
the screen.
- Simultaneously hold down the shift,
apple, and 4 keys. Your
cursor will turn in to a small cross, called a cross hair. You will
use this cross hair to create a user-defined box around the area
of the screen you want to capture.
- For
this example, place the cross hair to the left of the word file.
Click
and hold your mouse and drag it until a box appears around the part
of the screen you want to capture. In the image below, the red arrow
points to the cross hair, which has been dragged across the screen
while depressing the mouse button.
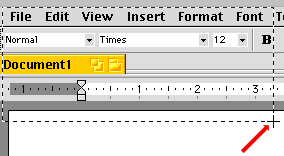
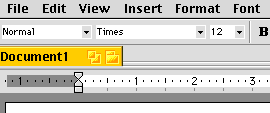
- When you have made a box around
the portion of the screen you want, as we did above, let go of the
mouse button. If the volume is turned up, you'll hear something
akin to a camera shutter. For the above example, the resulting screen
shot looks like this:
|
|
|
Where
did the image go?
 ow
you have captured, or taken a picture of a particular part of the
screen. You need to know where the image has been saved, and what
it is called, so that you can insert it into a word processing document.
Your computer will save this image as a MacPaint file, with the filename
"Picture 1" within your hard drive. The hard drive on a
Mac is usually visible on your desktop, often in the top, right-hand
corner. If you want to preview the image file you just created, before
including it in a handout, follow these directions. ow
you have captured, or taken a picture of a particular part of the
screen. You need to know where the image has been saved, and what
it is called, so that you can insert it into a word processing document.
Your computer will save this image as a MacPaint file, with the filename
"Picture 1" within your hard drive. The hard drive on a
Mac is usually visible on your desktop, often in the top, right-hand
corner. If you want to preview the image file you just created, before
including it in a handout, follow these directions.
- Double click on your hard drive.
This opens the drive and lets you see all of the files and folders
within it. It will look similar to the example below.

- Scroll down until you find the MacPaint
file "Picture 1". Notice the icon next to it. This is
a visual indicator that "Picture1" is a graphic file,
rather than a folder or a document file. To preview this file, double
click on the icon and the file will open.
|
|
Inserting the image into your
handout
 ou've
now captured the image, you know where to find it, and you know what
it is called. The next step is to actually put it into your document.
You complete this step using your word processor. If you do not already
have a word processor open, open one now. In this example, we will
use Microsoft Word. To insert your screen shot into a document: ou've
now captured the image, you know where to find it, and you know what
it is called. The next step is to actually put it into your document.
You complete this step using your word processor. If you do not already
have a word processor open, open one now. In this example, we will
use Microsoft Word. To insert your screen shot into a document:
- First
open the document in which you want the image to appear.
- In that
document, place the cursor where you would like your image to be
inserted.
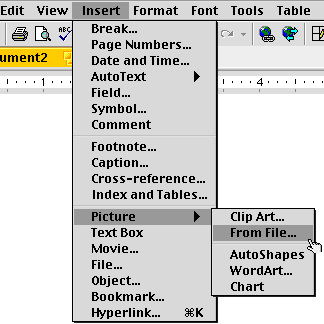
- Click
on the Insert menu at the top of the screen. A drop down
menu will appear. The cursor may turn in to a little hand while
you are in this menu. Please see the image below for an example.
- Click
on Picture > From File ... .
|
|
|
 nce
you click on the Picture > From File ... command, a dialog
box will appear. In this window you will look for, or "browse"
for your saved image. The portion of the computer that you are looking
in, whether this is the hard drive, the desktop, or a file folder,
will appear in a grey bar at the top of the dialog box. In the image
below, the computer is browsing the Desktop directory. nce
you click on the Picture > From File ... command, a dialog
box will appear. In this window you will look for, or "browse"
for your saved image. The portion of the computer that you are looking
in, whether this is the hard drive, the desktop, or a file folder,
will appear in a grey bar at the top of the dialog box. In the image
below, the computer is browsing the Desktop directory.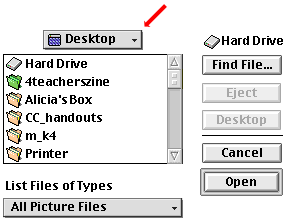
To insert your screen-shot
however, you'll have to change directories so that you are in the
Hard Drive.
- First, double click
on your Hard Drive icon.
- Scroll down and highlight
Picture 1. Again, you can look for the MacPaint icon next
to it.
- Click Open. Your
image should now appear inside your document where the cursor was.
|
|
Keeping track of multiple
pictures
 ow
you know how to make a screen shot and insert it into a word processed
document. It's likely, however, that you'll want to use more than
one image in your handouts. You can make as many screen shots as you
like; they'll all be saved automatically to your hard drive with names
like Picture 1, Picture 2, and Picture 3. With numerous screenshots,
you will probably want to rename the MacPaint files, so that you know
what each picture really is. Renaming a file is easy. Simply open
the hard drive, scroll down to the file, and click once on
the text -- not the icon. As you can see in the image below, this
highlights the text and lets you type in a new filename. ow
you know how to make a screen shot and insert it into a word processed
document. It's likely, however, that you'll want to use more than
one image in your handouts. You can make as many screen shots as you
like; they'll all be saved automatically to your hard drive with names
like Picture 1, Picture 2, and Picture 3. With numerous screenshots,
you will probably want to rename the MacPaint files, so that you know
what each picture really is. Renaming a file is easy. Simply open
the hard drive, scroll down to the file, and click once on
the text -- not the icon. As you can see in the image below, this
highlights the text and lets you type in a new filename.
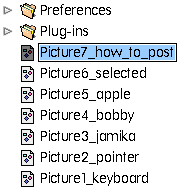
In the above example, the
user has kept the "Picture" prefix in the name. This keeps
all the screen shots together, because the files and folders in the
hard drive are listed alphabetically.
Another
way to keep screen shots together is to create a new folder for the
MacPaint files. To create a new folder on your desktop, click on your
desktop and then go to File > New Folder. An untitled
folder will appear on the desktop. To move your screen shots into
this folder, open your hard drive, and locate the files. Then
select the MacPaint files by clicking and dragging your mouse around
the filenames, as you see in the image below.
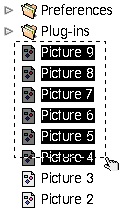
Then simply drag the files
into the new folder you have created on your desktop.
The
last way to organize your image files is to save them automatically
to a folder other than the hard drive. To do this, use the
advanced options of Flash-It by taking the screen shot by holding
down the shift, apple,
and 5 keys -- rather than the regular shift,
apple, 4 action. By using shift, apple,
5, you can save the file wherever you want, name it immediately,
send it to the printer, or put it in your clipboard. After you take
the shot, a dialog box will appear with these choices.
|
|
|
How do I include the
cursor in a screen shot?
 n
some cases, you may want to include the cursor in your screen shot.
For example, you may want your handout to show the pointing hand that
appears, or the cursor as a cross hair. The cursor comes in many forms,
each with its own function. n
some cases, you may want to include the cursor in your screen shot.
For example, you may want your handout to show the pointing hand that
appears, or the cursor as a cross hair. The cursor comes in many forms,
each with its own function.

Normally, when you use
the shift, apple, 4 or shift,
apple, 5 options, a cross hair appears that lets
you define the part of the screen you want to capture. This prevents
you from capturing the cursor however, as we've done many times in
the images for this article. To capture the cursor, you have to create
a true screen shot -- the whole screen. To do this, use
the shift, apple, and 3 keys. If you don't
want your final image to show the whole screen, you can always crop
the image in a graphics program like Paint Shop Pro or Adobe Photoshop.
Again, with the shift, apple, 3 option,
MacPaint files are saved to your hard drive.
You now
know the basic and advanced features of Flash-It, a common screen-capture
extension. Congratulations! Now you can make illustrated technology
handouts on any of the programs or skills your students need. As we
know from trying to learn new technologies with text-heavy user manuals
... a picture is worth a thousand words.
|
|
What
you need and where to get it
 here
are numerous screen-capture extensions that you can use to assist
you in technical documentation. Although Flash-it is very popular,
it is not the only extension available. Here are some of your choices: here
are numerous screen-capture extensions that you can use to assist
you in technical documentation. Although Flash-it is very popular,
it is not the only extension available. Here are some of your choices:
|
|
|
For the Mac
|
For the PC
|
Created by Alicia M. Bartol
& Jennifer Zink, University of Kansas,
Lawrence
|
|

|
Jennifer
Zink is a staff writer for www4teachers, and Alicia
M. Bartol is the Webmaster of www4teachers, located at University
of Kansas in Lawrence, Kansas.
SCRTEC takes nominations and ideas for Tech-along.
Send comments to the editor.
Tech-along © 2000 SCR*TEC.
This page is Bobby
Approved.
|
|
|


