|
 f
you are like me, the mere idea of "re-allocating memory" makes you
cock your head and furrow your brow. Well, let's remedy that, and
clear up the whys and hows of re-allocating memory. f
you are like me, the mere idea of "re-allocating memory" makes you
cock your head and furrow your brow. Well, let's remedy that, and
clear up the whys and hows of re-allocating memory.
What is re-allocating
memory?
The computer doles out
a default amount of memory for each program. Sometimes though,
the allotted memory is not enough. You can change the amount of memory
allotted to a program through re-allocation.
For example, when the application slows down, the game won't load, or multiple
open programs suddenly freeze, the computer perceives a lack of available
memory. When this occurs, memory becomes virtual
and resides in the hard drive
causing an immense slow down. These problems can sometimes
be solved through memory re-allocation.
You can re-allocate or
assign more memory to the applications that are most valuable to you.
For instance, imagine you are working on an article for an education
journal. While using Microsoft Word, you decide to simultaneously
open Netscape to double check an important fact. All of the sudden
your computer crashes. You hadn't saved your article! You have lost
the last hour's worth of work. You could have prevented your computer
from crashing - and trust me, they all crash - by re-allocating your
memory, effectively allowing the computer to use more memory with the
most important application, in this case, Microsoft Word. By doing
this, you insure your work with a few more kilobytes of safety.
|
|
How to find the application
 efore
beginning the next few steps, it is important to make sure that the
application whose memory you want to re-allocate is closed. efore
beginning the next few steps, it is important to make sure that the
application whose memory you want to re-allocate is closed.
- Locate its
icon either on the desktop
or on the hard drive.
- Make sure you locate the application
and not the application's alias.
Notice in the picture below that Netscape Communicator is an alias.
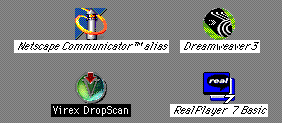
- An alias icon may also have a little
arrow on the bottom, left hand corner.
- If you are unsure, use the File
Find command, using your Finder.
Type the name of the application you are searching for and click
Find.

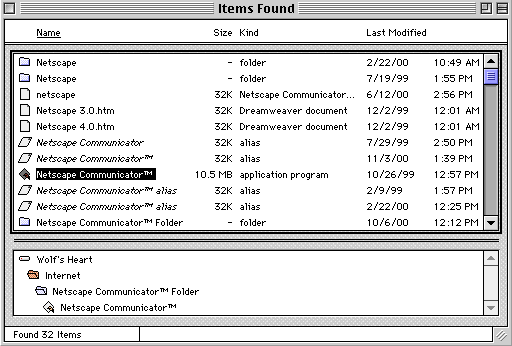
The list of items returned by a search for "Netscape," for example,
will show its status as an alias or application. Note in the image
below that the highlighted Netscape clearly says application program.
- Click the application icon only once so that it is highlighted.
|
|
| |
How to re-allocate the memory
- Once you have highlighted the application,
go to the File menu.
- Select Get Info.
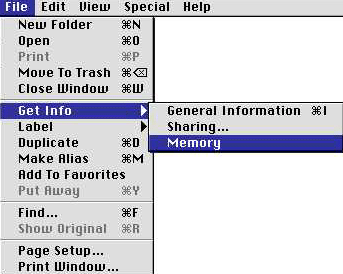
- If there is an arrow, like the one
in the image below, for a submenu next to Get Info,
select the Memory option.
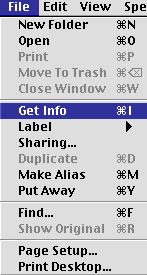
- If you prefer, you can use the shortcut
key which is the Apple key and the i. Notice that
if there is not an arrow then the shorcut key is listed next to
Get Info.
- Simultaneously hold down the keys represented below.
 
- You will then be given an Info
dialogue box.
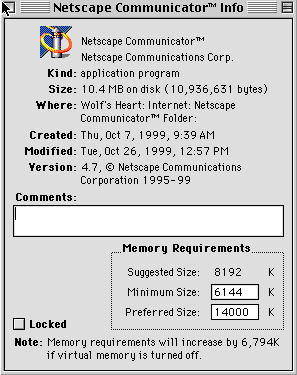
- In this box you will find three Memory
Requirements listed: Suggested Size, Minimum Size,
and Preferred Size. As you can see in the image below, these
are located in the lower right corner of the dialogue box.
- To increase the memory allocation
simply increase the Preferred Size.
- Also make sure that the Minimum
Size is equal to or greater than the Suggested Size.
|
|
|
What to do if problems
arise
 here
are a few problems that may arise the first time you try memory re-allocation.
You could wind up with an Info dialogue box, but no listed
Memory Requirements. If this is the problem, make sure that
in the Info dialogue box, beside Kind, it says Application.
Observe the image below, and notice that Alias is listed next
to Kind. here
are a few problems that may arise the first time you try memory re-allocation.
You could wind up with an Info dialogue box, but no listed
Memory Requirements. If this is the problem, make sure that
in the Info dialogue box, beside Kind, it says Application.
Observe the image below, and notice that Alias is listed next
to Kind.
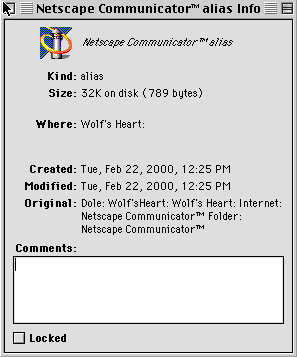
If it says Alias, that means
you highlighted the wrong icon in the beginning. Try using the File
Find while in the Finder, as suggested previously. Once
you have located the application, click once so that it is highlighted
and follow the directions listed above.
If you are getting an Info dialogue
box with the Memory Requirement boxes, but are unable
to make any changes, then the application whose memory you're trying
to re-allocate is still open. Quit the application and then follow
the steps above.
Another problem occurs when you allocate
too much memory. This happens when you allocate more memory than is
actually available. When you do this, you receive an ID=01 Bus
Error message saying there is not enough memory the next time
you try to use the application. If this happens follow the steps above,
but allocate less memory.
|
|
 y
following these instructions, you can safeguard the applications which
are most crucial. You should now feel confident in defining, performing,
and trouble shooting the once confusing words "re-allocating memory." y
following these instructions, you can safeguard the applications which
are most crucial. You should now feel confident in defining, performing,
and trouble shooting the once confusing words "re-allocating memory."
|
|
Created by Erica Schaapveld, University
of Kansas, Lawrence and Alicia Bartol webmaster of www4teachers.
|


