

|
Time wise |
|
Look at all of the ISTE technology standards you meet by knowing how to set your clock!
Click here for a detailed description. |
Macs Finding the date and time menu Under the Apple Menu, go to Control Panels, and select Date & Time by clicking it as shown in the image below.
The Date & Time window opens. In the image below there are four basic sections inside the window: Current Date, Current Time, Time Zone, and Menu Bar Clock. We are not going to worry about using a network time server.
|
|
Setting the current date
Click on Date Formats. Check the Region, as shown in the image below. It should say the region in which you live. I selected U.S. by clicking on the double arrow, and choosing it from the drop down menu.
Next look at the Long Date section of the Date Formats, shown below. Decide the particular order your date should appear. Do this by clicking on the double arrows to open the drop down menu. Select whether you want the Day, Weekday, Month, Year, or None listed first. Below, I chose the Month as the third item listed; the Weekday, and Day precede it. I end my date with the Year. Notice that this is also the second example listed under the samples. The text boxes, directly to the right of the drop down menus, are for the addition of punctuation in your date. When you have made all of your choices, continue on to the Short Date section.
In the Short Date section, select the order that you wish the shorter date version to appear. The Short Date does not have to be in the same format as the Long Date version. The month is now listed first, instead of the weekday. Make any other selections you desire, and click OK when you finish.
|
|
Setting the current time
Click on Time Formats. Again, check the Region, as shown in the image below.
Under the Clock section, shown on the left of the image above, click on the radio buttons to select which hour course you want your clock to take: 24 hour, 12 hour, and whether noon and midnight are represented by 0:00 or 12:00. Now look at the Format on the right side of the above image. Here, you must type AM and PM if you would like those shown next to the time. Also, enter a colon or any other separation device you wish to use. When all the selections are made, push OK to exit the Time Formats window. |
|
Choosing the correct time zone
Next, click Set Time Zone. Highlight a city that is in your time zone. I have selected Dallas, USA, because, like Kansas, it is in the Central Time zone. Click OK.
|
|
|
Selecting the clock’s options
The menu bar on the top right side of your Macintosh screen resembles the image below.
To view the date, click on the time.
Finally, click on Clock Options shown in the image below.
Under Menu Bar Display Format, select any options you would like to add by clicking in the boxes to the left. Under Chime Settings, a chime is available at different times throughout the day. If you wish for the clock to chime on the hour, click the box to the left of Chime on the hour. If you wish for the clock to chime at other intervals choose the drop down menus next to the clocks depicting fifteen-minute intervals, and select which sound you prefer. The last option offered is under Font Settings. Select the font and font size you want the date and time to appear in. In the image above, I chose the Skia font, set at 16.
|
|
PCs Finding the date and time menu
Another way to reach the main clock menu is by going to the Start menu. Choose Control Panel, and then click on Date/Time, as shown below.
|
|
Setting the date
|
|
Setting the time
|
|
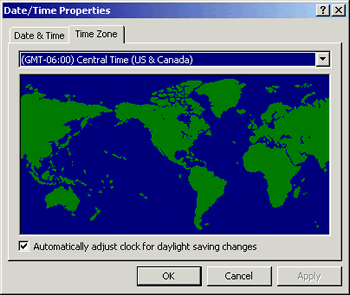
Choosing the correct time zone

If you wish to have you computer programmed to adjust for daylight saving, check the box next to Automatically adjust clock for daylight saving changes. A checkmark in the box signifies that the option is on. When all corrections are made, click Apply to enter the changes.
|
|
|
|